Duration of the plank - intense training or exercise for the body? How to do the plank exercise correctly: technique and common mistakes
The plank exercise is one of the best for abdominal muscles. It allows you not only to get abs of steel, but also to strengthen the muscles of your back, shoulders, and buttocks. The exercise is universal - it is equally effective for both women and men. To achieve the desired effect, you need to consider how to perform the “plank” correctly, otherwise you may get injured.
How to properly prepare for exercise
The plank exercise is not popular in gyms, since it’s unlikely to be possible to pump up abs this way. Its purpose is to strengthen muscles while burning fat. The effect will be positive only after the plank exercise is done correctly. There are basic rules that should be followed before class. You need to make sure that you can get into the correct position, and then start this abdominal exercise.
The important rules are as follows:
- The most important thing is a straight back position. If it bends or rounds, there is a risk of serious injury.
- The pelvis should be parallel to the floor, so the load is on lumbar region less.
- You should not keep your neck, head and shoulders tense; they should be located on the same plane.
- The lower limbs should be fully straightened. Any bending leads to the fact that the load on the lower back increases sharply.
- Shoulders should be above your wrists or above your elbows. Other options are not valid.
Having familiarized yourself with the basic rules, you can consider in detail how to do the plank exercise. This stand is different in that the most important thing about it is keep your body properly for as long as possible. It is much better to stand for thirty seconds as expected than to stand for 3 minutes with your back or legs bent. When deciding to perform the “plank” exercise, you can see how to do it correctly in the video, but due to the lack of active movements, it is better to seek the help of a trainer at the initial stage. Many people come to a suitable implementation on their own, gradually increasing the load and following all the rules. So, before starting training, you need to understand what position all parts of the body should be in.
To do this you need to do the following:
- stand with your back to the wall, feet together;
- heels, buttocks, shoulder blades and the back of the head should be pressed against the wall;
- lower your shoulders, a deflection will appear in the lumbar region (the palm should fit into it, if more, the position should be corrected).
You need to stand in this form several times a day, and always before the start of class. On day 3-4, the muscles will get used to it and doing the “plank” will become easier in the sense that the body itself will take the correct position.
What does the plank exercise do?
The plank exercise for weight loss is one of the most difficult, as it involves the weight of a person’s body. Its advantage is that most muscles are tense, making it great for warming up before serious training. By the trembling of the whole body, after 20-30 seconds it is easy to understand which muscles are working during the “plank” exercise:
- the press – it bears the main load;
- core muscles;
- gluteal muscles.
- the body is more toned, the skin will be elastic;
- the arms are stronger, but the muscles will not increase;
- The belly slimming bar will allow you to notice its reduction, especially in the lower part, which is quite difficult to get rid of.
All muscle groups are in a stressful situation, which is why this type of training is more effective for losing weight in the abdomen and sides than simply pumping the press. Not every person starting to lose weight is capable of performing such a complex exercise. Muscle tone Everyone is different, in some cases, you first need to master simpler techniques to strengthen them. What the “plank” exercise gives becomes visible almost immediately, provided regular classes
: the stomach becomes flat, the buttocks become elastic, the spine becomes stronger.
- After a short period of time, the following will become noticeable:
- carpal tunnel syndrome;
- any chronic diseases in the acute stage;
- high blood pressure;
- any spinal injuries;
- radial nerve neuropathy;
- pregnancy, especially if it has complications;
- spinal hernia;
any injuries and sprains of the joints of the elbows, shoulders, hands and feet.
Most often, the program is designed for 30 days, after which the result is simply amazing. If you want to continue practicing, it is recommended to increase the load, as reviews show that after a month it becomes much easier and efficiency decreases.
Types of exercise You can perform the “plank” in various ways, depending on your physical training person. Many people want to start weight loss exercises from the most difficult stage in order to quickly get rid of and bring your body into the desired shape. The plank is an exercise that is ideal for losing weight in the abdomen and sides, but only with a gradual increase in load. The degree of muscle tension depends on the type, more details about them in the table:
| This option is the simplest and ideal for beginners. The hands in this form are located directly under the shoulders, the back and legs are straight, look ahead
|
|
| The most popular option, support in in this case falls on the toes and elbows, the whole body is extended in a straight line. Breathing should be smooth
|
|
| This option is recommended when the usual plank no longer causes such fatigue and tension. Lying on your side, you need to lean on your legs and elbow, the arm on which you rely is perpendicular to the body. The second hand is located on the other side. Stretch your body in one line, tensing your abs
|
|
| The most difficult option that requires preparation. To perform the exercise, you need to straighten your body, leaning on your elbow, and then carefully straighten your arm. To make it more difficult, you can also straighten your other arm.
|


The duration of execution depends on the preparation of the person and the type of exercise. For beginners, it is enough to be in the correct stance for a quarter of a minute, which requires 3-4 approaches.. After the execution ceases to be painful, you can increase the time to 30 seconds, also 3-4 approaches. If you need to make the plank more difficult, it is recommended to increase the time to 1 minute for 4 approaches. When performing all types, you need to start with the most difficult one, ending with the simple version “on clasped hands.”
Contraindications
If you want to lose weight and strengthen your muscles, many people use the plank exercise, the benefits and harms of which are rarely studied. Of course, everyone knows that training can produce positive results in short time. Those who are especially concerned about their health will even learn from a trainer that, as a rule, there can be no harm from a seemingly simple exercise. It should be borne in mind that the plank exercise also has contraindications, albeit very few.
In other cases, you can perform the exercise as much as you like, the main thing is to listen to your body and sensations. In the absence of contraindications, a person has every chance to improve the condition of his figure in a short time.
Efficiency
The results after training using this exercise are simply amazing. Photos famous people who have achieved perfect abs using the “plank” can be seen in many magazines, and their opinion about this exercise makes you try for yourself its amazing effectiveness. Before starting classes with the plank exercise, a photo should be taken in advance so that after a month of training you can compare the results.
The plank is a universal exercise that works almost all muscle groups: back, arms, hips and abs. At the same time, the muscles do not increase in size, since there is no additional scales. How long to stand in plank depends on the goal pursued - losing weight or improving physical performance. The plank strengthens and heals the body, improves mood through the production of the happiness hormone and improves posture. It effectively burns the fat layer on the abdomen, which helps to create relief or simply make the stomach more toned. If you stand in the plank for at least 5 minutes every day, after a month the results will already become noticeable. Beginners can start with 1 minute per day, gradually increasing the time to 10 minutes per day. Of course, you need to exercise intermittently; after two minutes of training, you need to rest for 30-60 seconds.
The speed of the result depends on the time allotted for execution.
The duration of the plank can last:
- 1 minute. During this time, the body burns only 5 calories, but during training the muscles begin to actively work, starting metabolism for the whole day. Blood circulation throughout the body is also activated, vigor and efficiency increase, and mood improves. Usually, beginners stand in the plank for 1 minute, taking short breaks. In the first days, you should not overexert yourself by training for more than a minute. Later, you can gradually add a few seconds a day to give the muscles time to get used to it;
- 5 minutes. Five minutes of planking a day, done with short breaks, is very good result, meaning that you have perfectly trained your muscles. This good charge which burns 25 calories. During this time, the muscles should get very tired, but if you celebrate that you are not yet at the limit, add another minute a day.
- 10 minutes. Only true professionals who have been training for months can do this much in the plank per day. During this time, the body burns 50 calories, the muscles warm up perfectly and disperse blood throughout the body, starting metabolism. This training time per day is the maximum; standing any longer is not recommended so as not to damage the muscles.
It is worth focusing not on the duration of one approach, but on the quality of execution. It is better to do several approaches with a break throughout the day than to do everything at once.
Plank standing time
The time it takes to stand in a plank varies depending on the person and the goals they are pursuing. You should start with one minute a day, gradually adding 20-30 seconds.
What matters is not the longest execution time without interruptions, but the quality and overall execution time. It’s better to stand in the plank for 30 seconds and take a 1-minute break than to stand for a minute straight and give up training.
Interesting! Research shows that an athletic and trained person can hold a plank for 2 minutes without any problems. If you have not exercised before, you will have to start with less time and gradually increase it.
Despite the fact that the duration of the approaches is selected individually, general recommendations for a monthly training schedule still exist. They consist of gradually increasing the volume of training and its duration. By following this method, you will achieve excellent results and make your body stronger and more resilient. Let's start with the classic plank and short approaches. Looking back at the end of the month, you will be surprised to find that you have increased your approach time several times. By doing different variations of the plank exercise for 5 minutes a day, you can easily lose weight.
Monthly training program
This monthly training program will help you make your body more resilient and fit, without overstraining it:
| Day | Exercise time |
| 1 | 20 seconds |
| 2 | 20 seconds |
| 3 | 30 seconds |
| 4 | 30 seconds |
| 5 | 40 seconds |
| 6 | Rest |
| 7 | 45 seconds |
| 8 | 45 seconds |
| 9 | 1 minute |
| 10 | 1 minute |
| 11 | 1 minute |
| 12 | 1 minute 30 seconds |
| 13 | Rest |
| 14 | 1 minute 30 seconds |
| 15 | 1 minute 30 seconds |
| 16 | 2 minutes |
| 17 | 2 minutes |
| 18 | 2 minutes 30 seconds |
| 19 | Rest |
| 20 | 2 minutes 30 seconds |
| 21 | 2 minutes 30 seconds |
| 22 | 3 minutes |
| 23 | 3 minutes |
| 24 | 3 minutes 30 seconds |
| 25 | 3 minutes 30 seconds |
| 26 | Rest |
| 27 | 4 minutes |
| 28 | 4 minutes |
| 29 | 4 minutes 30 seconds |
| 30 | 5 minutes |
The plank is not a replacement for training in the gym; it is only suitable as a warm-up for morning exercises. The plank will not help you pump up your abs or buttocks and gain beautiful figure without additional training. Along with the plank, you must do a set of exercises or do cardio exercises, such as running. If you devote a few minutes to the plank during a break between work or during morning exercises, then it will definitely improve your physical fitness, help the digestive system and reduce back pain. This type of training does not last very long, which means it will not be difficult and not a burden.
The plank is a universal exercise. Its versatility lies in the fact that usually when performing physical exercises, not all muscle groups are involved, one or at most two. Lanka is amazing because when it is performed, all muscle groups of the body are involved at once. In other words, just one exercise allows you to pump and tighten your entire body at once. All muscles are evenly strengthened and the body is healed. Arms, back, stomach, legs - all these parts do not go unnoticed. But the question is how long to stand in plank so that the result will be noticeable soon.
Many people wonder how a static exercise can have such a miraculous effect on the body. In order to understand how the plank works, let's look at the classic version of the plank, because most people start training with this type of plank. Interestingly, the effectiveness and efficiency of this exercise depends on how often you perform the exercises, how long the plank is and how many approaches you do.
In 1 minute
First, you need to read more about this exercise, learn and understand its technique. Of course, your legs may immediately give way and your abs will tremble. This is not surprising, because an unprepared person can get tired from such strong tension, which is directed at all muscle groups at once. But there is a good side - just one minute of plank exercise will burn about 5 calories. At the same time, you have perfectly stretched and stretched your muscles. Blood supply began to work, as did metabolic processes, strengthened muscle corset and received sufficient quantity oxygen.
Practical advice: But don’t be a hero and try to hold the plank longer right away. This time is enough for beginners.
In 5 minutes
Some people can do the plank exercise for 5 minutes a day. This result is worthy of applause, so it is quite difficult. In 5 minutes of plank exercises you can lose 25 calories each muscle fiber warmed up and tensed up. If we talk about muscles, then a 5-minute load can clog the muscles. You can stop the exercise at this point.
In 10 minutes
10 minutes of planking is worthy of respect. Standing for so long is a great success. Perhaps, for any body, 10 minutes in the plank is quite a severe test, because during this period the muscles have developed to full capacity, and the posture has become even. It’s better to stop there, because you can inadvertently damage your muscles.
Important! There is no need to chase the duration of the exercises. If you do a short plank, but regularly and with several approaches, you can also get excellent results.
At the same time, the plank is an exercise where quantity and quality are not important, so it is best to concentrate on the correct execution of the plank than on the duration of the approaches.
Optimal time
There is no clear answer to the question of how long to stand in the plank. It's about individual fitness and the capabilities of your body. One person can easily stand for three minutes; for another, even 30 seconds will be especially difficult. You need to soberly assess your strengths and not harm your body.
Exercise schedule
There are general recommendations for performing the exercise, even though it is still better to draw up such a schedule individually. In short, you need to gradually increase the volume of training. Moreover, this concerns not only the duration, but also the number of approaches. If you follow this model, you can soon make your body beautiful and fit. It’s better to start with the classic version of the plank, and let the initial approaches be short, 30-60 seconds. Gradually increase the time of approaches and their number, and in a month you will be able to see the result.
Body works great
Surprisingly, when standing in a plank, a static exercise, the human body works intensively. Of course, it is not easy, even if at first glance it seems that nothing is easier than standing on your toes and hands for a couple of minutes (by the way, you can start by doing a plank on your elbows. This will lighten the load and allow your body to get used to the exercise) .
Note! Of course, the plank will not replace a full set of exercises; however, if you are overweight, then you should not give up proper nutrition either.
The plank is effective in combination with other measures for slimness. There must be a set of exercises. But the bar definitely helps in this fight against overweight and allows you to achieve the desired relief much faster. Just a few minutes in the plank every day - and you will do your body an excellent service, making your body more elastic, flexible and beautiful. In addition, this is an excellent prevention of many diseases, in particular, back pain and digestive system. Remember that everything is in the hands of a person, and it is up to you to decide when to take a healthy and correct path.
The plank exercise is a great way to strengthen not only the abs, but also the entire muscle corset, increase strength and, make the silhouette fit and improve well-being. The plank has dozens of variations, varying in degree of difficulty, however, they are all performed on the basis basic technology. The exercise is used in fitness, yoga, Pilates and various health practices. Let's look at what muscles work in this exercise, how to perform it correctly and what results it gives.
Muscle work
The main muscle groups that support the body in a straightened position during the plank are the abs and back. In addition, the muscles of the chest, shoulders, front surface of the thighs and buttocks are included in the work. In other words, the distribution of the load among the muscles when performing the classic version of the exercise (standing on the elbows) is as follows:
- Abs, especially the rectus abdominis. The abs bear the main load - the abdominal muscles prevent the body from sagging down under the influence of gravity.
- Back muscles, especially the lower part. They support the body in a straight position, tighten the ribs, and pull the arms towards the body, allowing you to stabilize the angle between the body and the shoulders.
- Large chest and deltoids. These muscles allow you to hold yourself up in your shoulders without sagging your chest down.
- Gluteus maximus, quadriceps, calf muscles. These muscles ensure the level position of the legs and pelvis.
Looking at the list above, we can safely say that the plank trains almost all the muscles of the body. Variations of this exercise allow you to increase the load or shift its emphasis to certain muscle groups.
The classic plank exercise (sometimes also called a “plank”) is an isometric exercise. This means that if you do it correctly, there is no movement in the joints, i.e. the pose remains static. However, there are also dynamic options, including turning the body, raising and lowering the arms or legs.
Benefits of planks
The plank is not an exercise designed to build six-pack abdominal muscles. Its benefit lies precisely in the comprehensive strengthening of the entire muscle corset. The volume of muscles does not increase during its implementation, but the muscles become toned, their strength and endurance increase.
The benefits of the plank exercise are as follows:
- There is a strengthening, development of strength and endurance of a large number of muscle groups (abs, back, legs, chest, shoulders).
- The stomach tightens, the waist becomes narrower, the looseness of the silhouette disappears, which is very useful in the process of losing weight.
- The position of the lower spine is stabilized. At this point it is worth saying that if you have diseases or injuries to the spine, you should consult a doctor before performing the exercise. Sometimes increasing the tone of the muscles surrounding the damaged area may be contraindicated.
- The skill of holding the body straight is developed. This will greatly help you both in everyday life and when you do other fitness exercises, such as squats.
In addition to the above, it can be noted that you do not need any additional equipment for training. You can exercise at home, in the gym or anywhere.
Will planking help you lose weight?
The effectiveness of the plank for weight loss, like any other exercise, is measured by how much energy you expend on doing it. In other words, you shouldn’t consider it as a magic remedy that will help you lose weight. Dynamic variations of this exercise burn more calories than static variations.  Regular planking, along with diet, helps to get more pronounced results in the process of losing weight.
In general, you can create an entire workout solely from planks. However, such monotony will quickly tire you. Therefore, it would be correct to combine the bar with others exercise. The weight loss effect will appear if you spend more energy than you get from food.
Visually, the bar helps make your figure slimmer by toning the abdominal and side muscles. In principle, this provides good help for starting to lose weight.
How to do the exercise correctly
There are essentially two classic versions of the exercise:
- in emphasis on straight arms;
- resting on your elbows.
Doing the exercise on straight arms is easier than on the elbows. This is because in this case most of the weight of your body falls on your legs, which is quite common, the load on top part the body is smaller and it is easier to maintain the position of the body. When you lower yourself onto your elbows, the distribution of weight between the points of support changes. You have to make much greater efforts to maintain your body in an even position.
Technique for performing the plank on straight arms:
- Take a resting position on your palms. Place your hands directly under your shoulders. Your entire body should be in a completely straight line. That is, you keep your back straight, without bending in the lower back (your pelvis is slightly twisted), your legs are in one line with your back - your buttocks do not rise up, your stomach does not sag down (your abs are tense). Pay special attention to the position of your shoulders and neck. The chest should not sag between the shoulders. The neck is an extension of the back, the gaze is directed to the floor, there is no need to raise the head. Your legs are straightened at the knees, you rest on your toes.
- Stay in a static position for as long as you can. Continue standing until your technique begins to break down due to muscle fatigue. The fact that the muscles begin to tremble in the last seconds is a normal phenomenon. As soon as you feel that you are no longer able to maintain the pose correctly, lower yourself to the floor, rest a little and repeat the exercise 1-2 more times.
 Technique for performing with straight arms.
 As for the width of the feet, it is not of key importance. The wider your legs are, the easier it is to do the exercise. Feet together - a more complicated option.
Technique for performing the exercise with emphasis on the elbows:
- The starting position is the same as in the previous version, only you place your hands not on your palms, but on your forearms. The elbows are located strictly under the shoulders, the body, neck and legs form one line. Make sure that there is no deflection in the lower back, the buttocks do not rise up, and the stomach does not sag.
- Stay in this position for as long as possible. Repeat the approach 1-2 times.
 Technique with emphasis on the elbows.
 Many practitioners have a question: how long should you hold the bar and how often should you perform this exercise?
If holding the plank “as long as possible” seems too vague to you, start with 30 seconds. After you master holding the pose for 30 seconds in three approaches, increase the time by 10 seconds and hold it for 40. So, gradually strive to achieve three minutes in one approach. If you have reached a good level of fitness, start mastering more complicated variations of the exercise.
You can do the plank as often as your time and desire allow. It's great for completing an ab workout or complex training for the whole body. You can do this exercise separately any time you have the opportunity.
10 plank variations
As they say, you can make your life more difficult in two ways:
- By reducing the number of support points (raising an arm or leg).
- By adding dynamics (by doing push-ups with your hands or stepping with your feet or doing crunches).
You can diversify the load you receive by changing your body position, that is, by doing:
- side strips;
- back slats.
Let's look at how to perform all of these options correctly to get the maximum effect from your workout.
Raise your hands
This variation of the exercise will increase the load on the core and upper body muscles, in particular the shoulders. In addition, small stabilizer muscles responsible for maintaining balance come into play here.  Support on three points - the arm is extended forward.
- Take a classic plank pose with your arms outstretched (easier) or on your elbows (difficult). Shift your body weight onto one arm, lift the other off the floor and extend it forward. Lock yourself in this position and try to hold it as long as you can.
- Lower your hand, then repeat the movement with your other hand.
Raise your feet
Here, additional load falls on the gluteal muscle and the back of the thigh. The core stabilizer muscles also work.  Raising your leg puts stress on your gluteal muscles.
- Stand in a plank position on your elbows or straight arms. Maintaining a stable lower back position, lift your straight leg off the floor and lift it up. Lock yourself in this position. Raising the leg is performed without a jerk, in a controlled manner.
- Return to starting position and repeat the exercise with the other leg.
Two-point support
This exercise is a synergy of the previous two. You keep your support on just two points - this is a pro level.  Support on two points requires good coordination of movements.
- Take a classic plank pose. Extend your arm straight forward and lift it up opposite leg. It is quite difficult to maintain balance in this pose, so it will require not only physical preparation from you, but also mental concentration.
- Lower yourself to the floor, switch legs and arms, and repeat the movement.
Plank push-ups
Doing the plank exercise this way adds dynamic work to the exercise. The load on pectoral muscles and triceps.  Complicating the exercise by adding push-ups.
- Take a plank pose with straight arms and fixate.
- Without changing the straight position of your body, lower yourself onto your elbow with one hand. Then do the same with the second hand. So, you are already standing in a plank position with emphasis on your elbows.
- Now you need to rise back to straight arms. That is, sequentially do push-ups with each hand. Straighten the arm that you bent first, then place it on your palm and straighten the other arm.
- Repeat the exercise as much as you can.
Feet together - legs to the sides
This variation of the abdominal plank gives additional stress to the gluteal muscles.  Alternately, we move our legs to the sides and return to the midline.
- Get into a plank position on your elbows or straight arms, depending on your fitness level. Bring your legs together.
- Step one foot to the side. Step sideways with your other foot. Return the first leg to its place. Place your other foot towards it. While “walking”, control the position of your lower back.
- Repeat the exercise.
With twisting
Another dynamic variation that works the obliques.  Add body crunches to the exercise.
- Take a support position with your arms straight.
- Lift one arm off the floor and lift it up, twisting your body. Both legs remain on the floor, but the shoulders change their position from horizontal to vertical. The arm is extended vertically, the gaze is directed to the side.
- Lower your arm and return your shoulders to a horizontal position, but instead of placing your palm on the floor, move your arm under your body and stretch in the opposite direction.
- Raise your arm again and lower it, stretching in the opposite direction.
Knees to shoulders
This version of the exercise is performed as follows:
- Support yourself on your elbows or palms.
- Pull your knee across the side towards your shoulder of the same name.
- Return your leg to its place. Repeat the movement with the other knee.
 The knee is brought to the shoulder across the side.
 The side plank allows you to create a static load on the oblique abdominal muscles.
- Get into a classic plank position. Turn your body sideways, raising one arm vertically up. The legs can be placed crossed one after another, or the leg located below can be placed on outer part foot, and place the second one on top of it (this option is more difficult, since there are fewer support points). Your legs, pelvis, back, neck and head should form one straight line.
- Lock the position and try to hold it for as long as possible. Then, switch sides.
 The side plank trains the obliques.
 This version of the exercise can be complicated. To do this, the leg that is on top should be raised up. The side plank requires perfect balance control and trains balance well.
This is the last type of plank in our selection. All the basic principles of performing the exercise, such as a completely straight body, remain in effect. Only the position of the body changes.
- You need to get into a plank position with your belly up. To do this, sit on your buttocks and lean on your hands from behind. Extend your legs straight in front of you.
- Transferring your body weight to your hands, lift your buttocks and stretch out. The gaze is directed upward. The neck and spine are straight. This is the reverse bar.
- Lock yourself in this position. Get down to the floor.
 Performing a reverse plank.
 As a complication, you can alternately raise your legs up.
So, we figured out how to do the classic plank correctly, and also listed 10 of its variations that allow you to increase the effectiveness of your workout, diversify the load and work out almost all major muscle groups.
Beginners are recommended to start with the basic version of the exercise, gradually mastering more complex options. This way, you will strengthen your muscles, tone your body, become stronger and more resilient, and also be able to improve your results in other exercises.
As for losing weight, the plank can be a good help in this process, but doing it alone will not be enough. In order to get a powerful fat-burning effect, you need to engage in intensive physical exercise and.
The plank is a static exercise on the floor with emphasis on the hands or forearms. Planck is considered one of the most effective ways remove the belly and tighten the body. Is it really? Let's figure out what the benefits, advantages and harms of planking are, how to do it correctly and how often, is planking effective for weight loss? We also offer you a unique selection: 45 options for exercises with a plank in pictures!
Plank exercise: general information
The bar has long been classic exercise not only in abdominal workouts, but also in general workouts for the whole body. This multifunctional exercise allows you to use a large number of muscle groups, and at the same time does not require any additional equipment, special skills, or extensive experience from you. The plank can be practiced by both beginners and advanced practitioners. It is thanks to its practicality, effectiveness and universal accessibility that the plank exercise has gained widespread popularity.
The plank engages the muscles of the upper and lower body, which means you will strengthen your body, making it elastic and toned. This exercise is especially useful for the development of the muscle corset (abdomen, back, buttocks). Strong muscle corset supports the back and spine , which means it helps reduce the risk of injuries to the musculoskeletal system.
How to do a plank correctly?
Get into a floor rack position—a push-up position. Bend your elbows 90 degrees and shift your weight to your forearms. Your whole body should form one straight line, your stomach should be tucked, your muscles should be tense.
What to pay special attention to:
- Head and neck: should be relaxed and free. Look at the floor, don't raise your head up.
- Hands: Hold them straight in front of you or cross them. Place your elbows strictly under your shoulder joints so as not to create unnecessary stress on your shoulders. Keep your shoulders down, don't raise them towards your ears.
- Small of the back: It can neither be rounded nor bent. Imagine that your lower back is pressed tightly against the wall.
- Legs: Must remain straight and tense. Otherwise, the main load will be transferred to the lower back, and not to the abdominal muscles.
- Buttocks: Should also be tense and level with your back. Don't arch your pelvis or lift your buttocks up.
- Stomach: pull in, and then (already pulled in) try to pull it towards the ribs. Keep it taut throughout the exercise, but do not hold your breath.
- Feet: can be put together, can be spaced out a little. The closer you place them to each other, the greater the load on the abdominal muscles.
- Breath: Be sure to remember to breathe deeply throughout the exercise. Inhale and exhale slowly and steadily.

Hold the plank position for as long as you can. Beginners can hold the plank for 15-30 seconds, average level– 30-60 seconds, advanced – 60 seconds or more. When you feel that it is becoming difficult for you to maintain proper form, end the exercise. Never increase the duration of an exercise at the expense of technique! It’s better to take a break and repeat the exercise in 3-4 circles with short stops.
Plank fits for all levels of training because you can always increase or decrease the duration of the static position depending on your fitness level. Also, this exercise can always be modified and complicated. If you are a beginner, do the plank on your knees. If you are an advanced practitioner, you can raise your arm or leg and hold the bar in that position.
How to increase plank execution time?
- Practice the plank every day, perform the exercise in several approaches. If possible, do the plank 3-4 times a day.
- Try progress every 4-5 days. For example, by increasing the time you hold the plank or increasing the number of approaches.
- Do other exercises to develop different muscle groups. For example, push-ups, squats, exercises with dumbbells for arms and shoulders.
- If you have been practicing the plank for a long time and calmly hold it for several minutes, then proceed to more complex options performing this exercise. Your muscles are probably used to the load, so the effectiveness of the plank is reduced.
Sooner or later the body adapts to any exercise. You should not constantly move towards increasing the plank time; it is better to move on to more complex versions of this exercise. If 2-3 minutes of planking is not particularly difficult for you, then feel free to move on to more complex modifications.

Contraindications to performing the plank
Despite the fact that the plank seems to be a fairly harmless exercise, in certain cases it is not recommended to perform it. The plank has the following contraindications:
- Injuries to arms, shoulders, feet
- Pregnancy and postpartum period
- Big overweight(you can do the plank version on your knees, but no more than 30 seconds)
- Hypertension or hypotension
- Intervertebral hernia
- Spinal injuries
- Diseases of internal organs
- Exacerbation of chronic diseases.
What muscles are involved when doing the plank?
When performing a plank, the muscles of the abdomen, back and shoulders are primarily involved in the work. The plank also engages the muscles of the buttocks, chest, calves, front and back of the thigh.

So, during the classic plank the following muscles are involved:
- Rectus and transverse abdominis muscles
- Latissimus dorsi muscle
- Muscles of the lumbar region
- Muscles of the shoulder girdle
- Trapezoid
- Pectoral muscles
- Gluteal muscles
- Quadriceps and hamstrings
- Calf muscles
When performing a side plank, additional load is placed on the oblique abdominal muscles, as well as on the muscles of the external and inner surface hips The side plank is one of the most best exercises to strengthen the oblique muscles and spinal stabilization for back health.

Training plan with static planks
We are offering to you ready plan plank workouts that can be performed as an addition to any program. Just follow the suggested plan and work on perfecting your figure. Four exercises await you: elbow bar, pLanka on hands, boforged bar on right hand, bshackle bar on the left hand.

You will repeat all exercises in several approaches. We offer you this plan:
- First week: each exercise for 15 seconds in 3 sets, break between sets 30 seconds, break between exercises 60 seconds.
- Second week: each exercise for 25 seconds in 3 sets, break between sets 30 seconds, break between exercises 60 seconds.
- Third week: each exercise for 35 seconds in 3 sets, break between sets 20 seconds, break between exercises 60 seconds.
- Fourth week: each exercise for 45 seconds in 3 sets, a break between sets of 20 seconds, a break between exercises of 60 seconds.
If necessary, you can adjust the proposed plan or perform each exercise at a more comfortable time for you or perform simplified modifications (on your knees).
The benefits, harm and effectiveness of planks for weight loss
The benefits of doing planks
1. Plank is perfect exercise for the abdominal muscles, since it covers all major groups abdominal muscles, including transverse, rectus, oblique muscles.
2. The plank engages not only the core muscles, but also the muscles of the shoulders, chest, buttocks, upper back, front and back of the thigh. This is a unique exercise that will force your entire body to work.
3. Thanks to the plank, you will strengthen the muscle corset that supports your spine, which is excellent prevention of back pain.
4. Using a plank, you will strengthen your back and buttocks without damaging the musculoskeletal system and joints (as opposed to, for example, deadlifts, squats and lunges) .
5. Doing planks regularly will help you maintain a straight posture and a straight back.
6. The plank exercise is available to everyone: from beginner to advanced. Simply adjust the time you hold the static position depending on your training.
7. By strengthening your core muscles, you can improve your balance and balance, which will be useful to you in everyday life.
8. Unlike many other abdominal exercises, the plank does not have a damaging effect on your lower back.
9. The bar has a large number of modifications: our article alone offers more than 40 options!
10. You can do the plank absolutely anywhere: at home, on the street, in the gym. You just need some free space.

Harm of the plank
However, despite all the benefits of the plank, this exercise can be fraught with danger. For example, if your core muscles are not strong enough, your spine will sag during a plank, causing pressure on the spinal discs, lower back and shoulder joints . With the slightest violation of the correct form of the exercise, you may feel pain in the neck or lower back.
In addition, staying in the plank for a long time can cause increased blood pressure and even a heart attack, with people with hypertension especially at risk. Therefore, you should not be in the plank for more than two minutes at a time. If you want to increase the load on the muscles, then it is better to go towards more complicated plank options (for example, with an arm or leg raised) than in the direction of increasing the time of the static position.
For people who are overweight, it is recommended to do the plank on your knees. This will help reduce stress on your back and joints. However, the bar is one of the most safe exercise for core muscle development . It is much less damaging to the spine than most other abdominal exercises that are performed on the back.
Typical mistakes when doing planks
In order to avoid spinal problems from performing the plank incorrectly, we draw your attention to typical mistakes in this exercise:
- hunched back, shoulders down
- lifting the buttocks up, above head level
- arching or rounding in the lower back
- relaxation of the abdominal muscles, legs and buttocks
- lifting the head up and bending the cervical spine
- holding your breath

Is planking effective for weight loss?
The plank strengthens muscles, works the core, improves the tone of the hips, buttocks, arms and shoulders, but the plank is not suitable for burning fat and losing weight. effective exercise. The plank does not help to remove the belly and get rid of the sides! This exercise is designed to tone muscles, not burn fat.
Moreover, we emphasize once again that The process of losing weight depends on nutrition, not from exercise. Exercising helps burn more calories, tone muscles, improve body quality, but getting rid of excess weight occurs only with food restrictions (calorie deficit). The plank and its modifications are a great way to strengthen the body, get rid of sagging and lack of exercise, but to lose weight, dietary restrictions are required.
If your goal is to lose weight, then it is better to focus on dynamic exercises which help you burn more calories than static exercises. Ideally regularly do cardio exercise. Moreover, cardio exercises can also be performed in the plank, thereby achieving two goals at once: burning calories and strengthening the abdominal muscles. Read more about plank cardio exercises below.
45 plank exercises: a unique selection!
If you're ready to enhance your workouts with more variety of plank exercises, then we offer you our unique selection: 45 various options exercises with a plank with visual pictures. From these exercises you can create a complete training program. You can use our options ready-made programs or create your own set of exercises.
If you can already comfortably hold a classic plank for 2-3 minutes, you should not increase the difficulty until you hold a static position for 5-10 minutes, as many sources advise. Most likely, your muscles have already adapted to the load, so it will be more effective make the load more difficult , i.e. move on to more advanced modifications of the exercise.
We offer you 45 plank exercises. They conditionally divided into 5 groups: static exercises, hand plank exercises, elbow plank exercises, side plank exercises, cardio plank exercises. If you decide to create your own training plan, then it is advisable to use exercises from each group.
You can also make training with planks more difficult using additional equipment:
Static plank exercises:
1. Plank on hands (Plank)

2. Forearm Plank

3. Side Plank

4. Reverse Plank

5. Wall plank

6. Levered Plank

7. “Star” (Star side plank)

8. Plank single leg

Hand plank exercises:
1. Touching the hand forward in the plank (Plank alternating reach)

2. Plank leg raise

3. Plank shoulder tap

4. Plank opposite knee touch

5. Crossbody mountain climbers

6. Plank lateral walk

7. Spiderman plank

8. Plank Up & Down

9. Plank dumbbell raise

10. Leg raise + Touch elbow crisscross

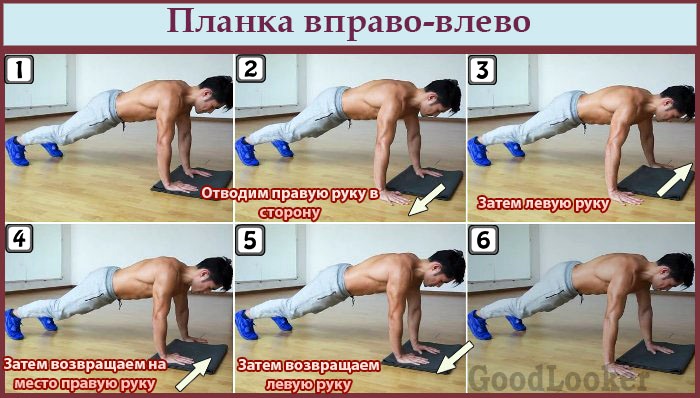
11. Plank right-left (Plank In & Out)
12. Superman Plank

13. Plank arm raise

14. Down to toe tap

15. Windshield wipers

16. Sliding your knee up and down your arm (Arm sliders)

17. Plank walkout

18. Rotate 360 degrees (Plank barrel roll)

19. Rotate the body sideways (Plank T-rotation)

Elbow plank exercises:
1. Turns in side bar(Side plank roll)

2. Plank saw

3. Knee to elbow

4. Hip raise plank

5. Legs to the side in plank (Starfish march)

6. Body turns in plank (Plank rocker)

Side plank exercises:
1. Hip drop side plank

2. Rotate the body in a side plank on the elbows (Forearm plank reach through)

3. Turning the body in a side plank (Plank reach through)

4. Crunch side plank

5. Raising the arms and legs in the side plank (Star side forearm plank)

Cardio plank exercises:
1. Jumping jack

2. Plank knee tuck

3. Mountain climbers

4. Plank toe tap

5. Jump into the plank with your buttocks up (Plyo peak plank)

6. Plank heel click

Thanks to YouTube channels for the visual pictures: Republic of Strength, Jordan Yeoh Fitness, Dont Quit, Max's Best Bootcamp, Ammar Montaser, The Live Fit Girl.
A ready-made plank exercise plan for all fitness levels!
We offer you a ready-made plank exercise plan for all levels of training . Don't know which group of practitioners to include yourself in? Complete the beginner level, and if the load seems insufficient to you, then feel free to move on to the intermediate level.
You can always change the plan at your discretion by adding, replacing or removing any suggested exercises. Repeat the exercises in several circles or do one circuit if you don't plan to do a set of plank exercises for more than 5 minutes. If the exercise is performed on one side, then perform the first circle on right side, second circle - to the left.
First round:
- (Forearm Plank)(Crossbody mountain climbers)(Hip drop side plank)(Plank arm raise)(Windshield wipers)
Second round:
- (Reverse Plank)(Down to toe tap)(Jumping jack)
- (Plank opposite knee touch) (Starfish march)
How to do this plank workout for beginners?
- Perform each exercise for 30 seconds, break 15 seconds.
- Rest between circles 1 minute
- The total duration of one lap is 3.5 minutes
- Total workout duration: ~17 minutes

First round:
- (Plank single leg)(Mountain climbers)(Side plank roll)(Plank walkout)(Plank knee tuck)
- Plank spider (Spiderman plank) (Plank alternating reach)
Second round:
- (Side plank)(Plank Up & Down)(Forearm plank reach through)(Plank shoulder tap)(Hip raise plank)(Plank In & Out)(Plank dumbbell raise)
How to do this intermediate plank workout?
- We perform 2 laps each round
- Rest between circles 1 minute
- The total duration of one lap is 4.5 minutes
- Total workout duration: ~22 minutes

First round:
- (Wall plank)
- Full body rotation (Plank T-rotation) (Plank toe tap)(Superman Plank)(Plank lateral walk)(Knee to elbow)
Second round:
- Classic hand plank (Basic plank) (Plank leg raise)(Plyo peak plank)(Plank saw)(Star side forearm plank)(Plank Up & Down)
Third round:
- (Levered Plank)(Plank barrel roll)(Plank heel click)(Crunch side plank)(Plank shoulder tap)(Leg raise + Touch elbow crisscross)
How to do this advanced plank workout?
- We perform each exercise for 30 seconds, break 10 seconds.
- We perform 2 laps each round
- Rest between circles 1 minute
- Total duration of one lap ~4 minutes
- Total workout duration: ~30 minutes